Solo Wedding Planner Organization Tips That Work
Solo Wedding Planner Organization Tips That Work

Running an entire wedding operation by yourself is genuinely hard. You are the creative director, project manager, client liaison, vendor coordinator, and day-of problem solver all at once. Without solid solo wedding planner organization tips guiding your workflow, the details that make or break a wedding start slipping through the cracks. This article gives you a practical, field-tested framework covering digital systems, vendor workflows, emergency preparedness, checklists, and automation. Every tip here is built specifically for the solo planner who needs to move fast and stay ahead.
Table of Contents
- Key takeaways
- 1. Build a centralized digital hub first
- 2. Master vendor management before the event week
- 3. Stock and position a wedding day emergency kit
- 4. Build a master timeline with real deadlines
- 5. Automate client communication and administrative tasks
- 6. Use a consistent vendor contact sheet format
- 7. Customize your system for each wedding type
- My perspective on what solo planning really demands
- How Thespecialwedding supports your solo planning workflow
- FAQ
Key takeaways
| Point | Details |
|---|---|
| Centralize everything digitally | Organize all wedding details in one digital hub structured by timeline to reduce confusion and missed steps. |
| Master vendor communication | Send confirmation emails one to two weeks out to prevent the majority of day-of vendor issues. |
| Build a wedding day emergency kit | Stock and position your kit strategically so you can resolve problems discreetly without disrupting the event. |
| Use checklists tied to deadlines | Checklists with task owners and due dates keep solo workflows on track and prevent oversights. |
| Automate repetitive client tasks | Automating intake, scheduling, and follow-ups frees your time for the work that actually requires you. |
1. Build a centralized digital hub first
Every strong solo planning operation starts with one source of truth. When you are managing a wedding alone, organizing by timeline rather than by category prevents the mental overload that comes from jumping between disconnected files. Instead of having a separate folder for budget, another for vendors, and another for the guest list, you want one structured workspace where every tab connects to the overall event timeline.
The essential components of your digital hub should include:
- Dashboard tab: High-level overview of event date, client names, venue, and completion percentage
- Budget tracker: Line-item expenses with paid, pending, and outstanding columns
- Vendor directory: Contact info, contract status, arrival time, and payment due dates
- Guest list and RSVP tracker: Names, meal choices, dietary needs, and table assignments
- Seating chart: Linked directly to your guest list so updates flow through automatically
- Day-of timeline: Minute-by-minute schedule accessible to vendors and clients
Custom spreadsheets actually outperform many wedding-specific apps when it comes to handling moving parts, deadlines, and budgets for planners managing events solo. The flexibility to add custom columns, color code urgency, and share with clients in real time is something rigid apps rarely match.
Pro Tip: Turn on version history in any shared document so you can see who changed what and revert if a client accidentally edits a critical field. This one habit has saved countless solo planners from costly data errors.
2. Master vendor management before the event week
Vendor chaos on a wedding day is almost always the result of poor preparation in the weeks before. The most effective approach to solo vendor management is maintaining one centralized vendor record that captures every critical detail: arrival times, onsite contact names, cell phone numbers, delivery windows, setup responsibilities, and payment status.
Here is a practical vendor follow-up workflow you can repeat for every wedding:
- Confirm contracts signed within 48 hours of booking each vendor
- Set payment reminders in your calendar for every deposit and final balance due date
- Send a detailed confirmation email to every vendor one to two weeks before the event
- Share the day-of vendor contact sheet with your point person and venue coordinator
- Do a final check-in call two to three days before the wedding for key vendors like catering and photography
Sending confirmation emails to all vendors with venue address, arrival times, and point-of-contact information prevents roughly 80% of vendor communication failures on the wedding day. That is not a small number. It means most of the vendor problems solo planners blame on bad luck are actually preventable with a single well-timed email.
For vendors you work with regularly, consider building a comparison table to track performance over time:
| Vendor type | Preferred vendor | Response time | Reliability rating | Notes |
|---|---|---|---|---|
| Photography | Vendor A | Under 2 hours | 5/5 | Always early |
| Catering | Vendor B | Same day | 4/5 | Confirm headcount twice |
| Florals | Vendor C | 24 hours | 5/5 | Send design notes week before |
Pro Tip: Designate a day-of point person who is not you and not the couple. This person holds the vendor contact sheet and handles logistics calls so you can focus on the client experience rather than fielding calls from the caterer about parking.
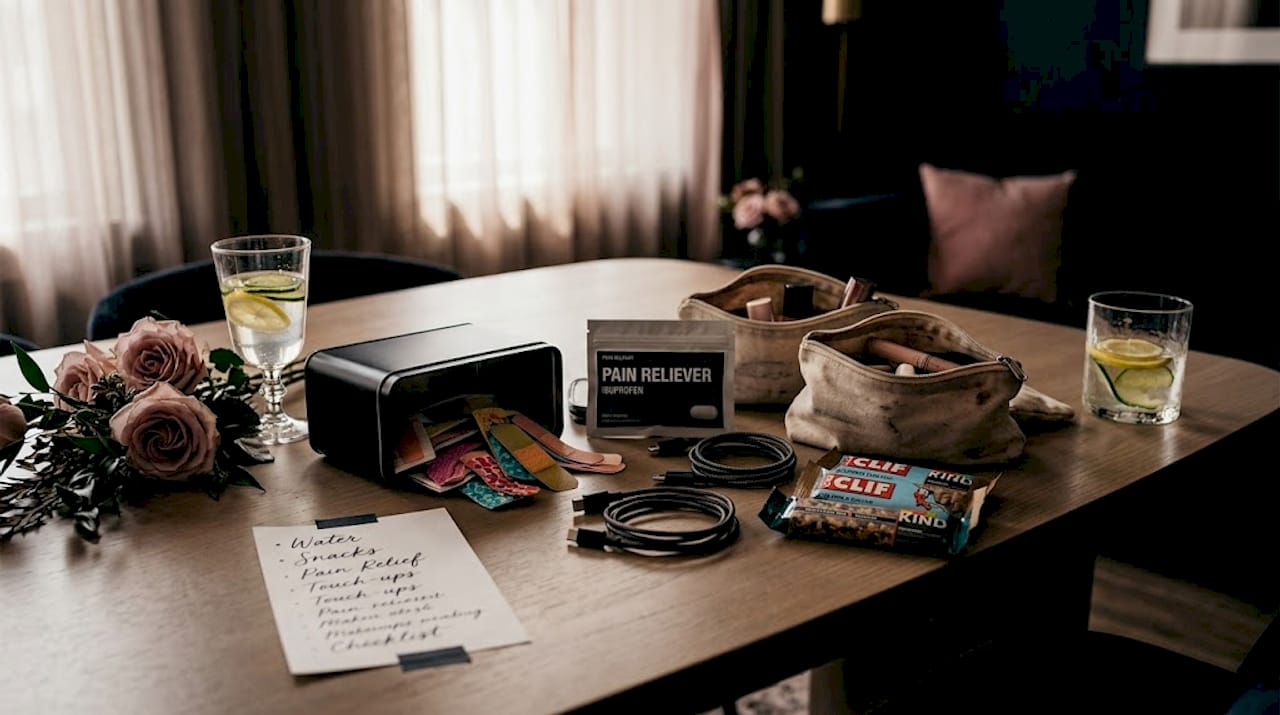
3. Stock and position a wedding day emergency kit
85% of weddings encounter at least one minor emergency that a well-stocked kit can resolve. For a solo planner, your ability to handle those moments discreetly and quickly is what separates a good reputation from a great one.
Your kit should cover four categories:
- Wardrobe: Safety pins, fashion tape, needle and thread (black, white, nude), stain remover pen, extra buttons, hem tape
- Beauty: Bobby pins, clear hair elastite bands, travel-size hairspray, blotting papers, touch-up powder, lip balm
- Health and comfort: Pain reliever, antacid, bandages, blister cushions, energy bars, breath mints
- Tech and logistics: Portable phone charger, earbuds, spare batteries, printed copies of the day-of timeline, small amount of cash
The most commonly forgotten items across planners are the portable charger, a straw for the bride to drink without smudging lipstick, snacks, a printed timeline copy, and cash. These seem minor until they are the exact thing you need at 4:30 PM.
Kit placement matters just as much as kit contents. Never store your emergency kit in your car trunk or any location that requires leaving the venue to access. Place it at the getting-ready suite, the coordinator station near the ceremony space, or behind the bar where your point person can reach it fast. For events spanning multiple locations, duplicate the most critical items across two smaller kits rather than relying on one large bag.
Assigning a trusted kit captain who knows the contents and stays reachable throughout the event ensures you are not the one fumbling through a bag while simultaneously managing a vendor question.
4. Build a master timeline with real deadlines
The difference between a solo planner who feels in control and one who is constantly reacting is almost always the quality of their timeline. A vague task list with items like “confirm vendors” or “finalize seating” is not a plan. A plan has a specific date, a clear owner, and a done column.
Structure your planning timeline in three phases:
12 to 6 months out: Lock in venue, photography, catering, and officiant. Draft the initial budget. Create your master spreadsheet and populate vendor rows as contracts come in.
6 weeks to 2 weeks out: Finalize guest count, confirm all vendor details, send the week-before confirmation email, complete seating chart, and prepare printed day-of timelines for the couple, venue, and vendors.
Final week: Confirm all vendor arrivals, distribute contact sheets, prepare your emergency kit, charge your phone and portable battery, and do a final venue walkthrough if possible.
Checklists with deadlines, task owners, and done columns are what keep solo planners from missing steps as complexity builds. When you are managing all roles yourself, a checklist is not a convenience. It is your accountability partner.
Pro Tip: Create a separate day-of checklist that lives on your phone, covering tasks from the moment you arrive on site to the moment you leave. Include time stamps. Solo planners who work from a printed or digital day-of checklist resolve issues 30% faster because they are not relying on memory under pressure.
5. Automate client communication and administrative tasks
Administrative work is where solo planners lose the most time. Answering the same intake questions, chasing down signed contracts, and sending payment reminders manually adds up to hours per client that you could spend on design, vendor relationships, or simply taking a breath.
The core tasks worth automating for solo wedding planners include:
- Client intake forms: Send a structured questionnaire automatically after initial inquiry to gather vision, budget, date, and guest count before the first call
- Contract delivery and e-signatures: Use a workflow tool to send, track, and archive signed contracts without manual follow-up
- Payment reminders: Automate reminders at 7 days, 3 days, and the day before each due date
- Welcome sequences: Set up a short email series that sends automatically after booking to introduce your process, set expectations, and reduce client anxiety
- Post-event follow-up: Trigger a thank-you email and review request automatically after the wedding date
Tools built for automating client workflows remove repetitive administrative work and free your time for the creative and strategic tasks that actually require your expertise. The goal is not to replace the personal relationship with automation. It is to automate everything that does not require a human judgment call so your time goes toward decisions that do.
The planners who use automation most effectively are the ones who keep a personal touch in their actual client interactions precisely because the routine work is handled.
6. Use a consistent vendor contact sheet format
This is one of the most underrated solo wedding planner organization tips and one of the easiest to implement. A standardized vendor contact sheet, built once and reused for every event, saves time and prevents the scramble of hunting for information at the wrong moment.
A strong vendor contact sheet includes the following for each vendor:
- Full business name and individual contact name
- Cell phone number for the onsite person (not just the office line)
- Arrival time and setup window
- Specific responsibilities (what are they setting up, delivering, or performing and when)
- Payment status (paid in full, deposit only, balance owed)
- Contract location (file path or link)
Share this sheet with the venue coordinator and your day-of point person at least one week before the event. When everyone holds the same document, you stop being the single point of failure for every vendor question.
7. Customize your system for each wedding type
Not every wedding runs the same, and your organization system should not be one-size-fits-all. A 50-person backyard ceremony has completely different logistical demands than a 250-person ballroom event. Treating them with the same level of complexity in your tracking system creates unnecessary work for small events and dangerous gaps for large ones.
For intimate weddings, simplify your vendor sheet to the six or eight vendors involved and reduce your checklist to a single page. For destination or multi-day events, add dedicated tabs for accommodation logistics, transportation schedules, and multi-venue emergency kit placement. Outdoor summer weddings warrant weather contingency plans documented directly in the master timeline, including vendor contacts for tent rentals and heating or cooling equipment.
The planners who build flexible templates they can scale up or down spend far less time on setup for each new client, which compounds over a full booking season.
My perspective on what solo planning really demands
I’ve worked alongside enough solo planners to say this clearly: the biggest threat to your organization is not a bad tool. It is the belief that you can hold more in your head than you actually can.
I’ve seen experienced planners lose track of a vendor payment because they relied on memory instead of their system. I’ve seen others add complexity to their spreadsheets they never actually used, burning hours on setup that didn’t improve their day-of performance. What I’ve learned is that the best solo planning systems are the ones you will actually maintain under pressure, not the ones that look impressive in screenshots.
There is also a widely repeated idea that going solo means you need to work twice as hard as a planner with a team. I’d push back on that. What solo planning actually requires is working twice as deliberately. Every tool, template, and habit you build should have one purpose: removing a decision you would otherwise have to make in real time. The planners I’ve seen thrive solo are not the most organized people in the abstract. They are the ones who build systems that think for them when the day gets chaotic.
The contrarian truth about personal wedding planning advice is this: stop looking for the perfect app and start building habits around the tools you already have. A disciplined Google Sheet beats an abandoned project management platform every single time.
— JOATLABS
How Thespecialwedding supports your solo planning workflow
If you are ready to move beyond scattered spreadsheets and disconnected tools, Thespecialwedding was built for exactly this situation.
The wedding planner platform brings client intake, vendor onboarding, event timelines, guest management, and communication workflows into one workspace. You get real-time dashboards, automated client portals, and customizable templates that replace the manual setup you currently rebuild for every new wedding. For vendor coordination specifically, the vendor directory gives you a structured place to source, track, and manage vendor relationships without jumping between contacts, emails, and spreadsheets. Solo planners can start lean and scale as their business grows, with no team required to get full value from day one.
FAQ
What is the most important organization tip for solo wedding planners?
Building a single centralized digital hub that organizes all wedding details by timeline is the highest-impact first step. It replaces scattered files with one workspace where budget, vendors, guests, and the day-of schedule all live together.
How do I manage vendors effectively when planning alone?
Send a detailed confirmation email to every vendor one to two weeks before the event, including the venue address, arrival times, and point-of-contact information. Research shows this one step prevents around 80% of vendor communication problems on the wedding day.
What should a wedding day emergency kit include?
A well-stocked kit covers wardrobe items like safety pins and fashion tape, beauty touch-ups, health basics like pain reliever and bandages, and tech essentials like a portable charger and a printed day-of timeline. The most commonly forgotten items are snacks, a straw for the bride, and cash.
How can automation help a solo wedding planner?
Automating client intake forms, contract delivery, payment reminders, and post-event follow-ups removes hours of repetitive administrative work per client. This frees your time for vendor relationships and creative decisions that actually require your judgment.
How do I build a wedding planner checklist that works?
Create checklists tied to specific deadlines and organized by planning phase, covering the 12-month window, the final six weeks, and the wedding week itself. Adding a task owner column and a done column turns a generic list into a working accountability system.
Recommended
Free wedding planner templates
Skip the blank page — these templates ship with the form fields you actually need.
Browse all 9 free templates →